Tuesday, November 29, 2011

I love lamp

Do you really love the lamp or are you just saying it because you saw it?
I love lamp. I love lamp.

Anchorman aside, I'm not sure that I love lamp. Not to say that it doesn't look way better than it did before. Lets be honest, it is not hard to make a lamp that my mother got from a garage sale while she was in college look better. That lamp is older than I am, it's about time it got a makeover. What I don't like about it is how tall the lamp is. I'm also not sold on the shade I made for it.
But....
being that this lamp has served my family well throughout my entire existence I will give it the benefit of doubt and allow it a spot on my blog.


Step 1. Gather supplies:

  • An old lamp. I suggest places like garage sales or goodwill stores. The cheaper the better.
  • Spray paint (whatever color you want your lamp to be)
  • Painters tape
  • Fabric (for the shade)
  • Hot glue gun and glue
  • Twine


Step 2. Admire the absolute awful gold and platinum finish and the pleated lampshade. Isn't just stunningly awful?
Step 3. Take the lampshade off the lamp and cover any parts that you don't want to get paint on with painters tape.
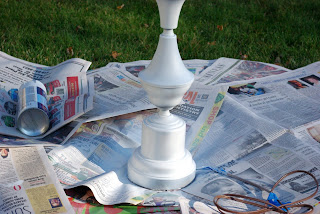
Step 4. Spray paint lamp the color of your choosing. I decided to go with white, but I think that a light blue could have been really beautiful too. To make sure that the paint didn't run down the sides I sprayed three light coats of paint. If you miss spots on the first few coats don't worry. You can get them the next time. Also make sure you read the can for instructions. With my paint, I had to let it dry for a little while before spraying it again. This is so the paint will stick to the other layers.


Step 5. I decided that I didn't like the deep indents in the lamp, so I grabbed some twine and wrapped it around the lamp. See pictures below. I believe that it makes it look a lot better, and slightly more "beachy". To get it to stay I just tied very tight knots.
And that's it for the base of the lamp. Now we just need a shade that doesn't look like it belongs on The Brady Bunch television set.
Step 6. Most shades that are pleated have an inner base that the pleats are glued to. Pull the pleated fabric off carefully so that you have the base left.

Step 7. Take the fabric that you chose earlier and cut it so that it will fit around the entire shade. If you are good at sewing now would be the time to bust out your sewing machine to hem the edges. If you are like me and would probably spend years trying to figure a sewing machine out there is another option. Hot glue. Flip the edges in and hot glue them down. This will stop the lamp from fraying. 
NOTE: you might want to test the hot glue on the fabric first. Sometimes it dries darker and look like a stain. If it stains you might want to purchase fabric glue instead.

Step 8. Wrap the fabric around the lamp and hot glue the edges down. Make sure that the fabric doesn't have any wrinkles. Cut off any overhanging fabric so that only a centimeter or so is left on the inside of the lamp. If you want you could stop here. I decided that I wanted the twine on the lamp to match the shade so I added a twine border on the top and bottom.
Step 9. Cut three long pieces of twine that will fit around the lamp. Braid them together. Glue them on to the top. 
Step 10. Repeat step nine. This time glue it on to the bottom. 
And here is the finished lamp. I think I might keep the base and go buy a cheap lampshade for it. I'm not sold on the one I made. But it does look way better than it did before. So I guess I can say I love lamp much more than I did before. Let me know what you think!


Tuesday, November 22, 2011

Starry Eyed

Today I got to mix two of my favorite things: organizing and crafting. My little sister is halfway through her senior year of high school, and she would really like a place to have friends over, so we are re-doing my basement over thanksgiving. My sister is quite the little task master, and today I got assigned organizing the "junk/toys/crafts closet. Much to my joy (and her dismay) I found four full boxes of arts and crafts with everything I could ever want in them. I then proceeded to spend most of the day arranging them into different categories and putting them all into a MUCH LARGER new craft box. I think it was a totally necessary step in organizing the closet, but I'm not sure my sister agreed.

Anyways, I have christmas lights hanging in my room instead of curtains, and I decided to make stars to hang from them to add decoration to my room. (For all those of you worried about my sister and the cleaning, don't worry I finished helping her before I started crafting.) So without further ado (I have always wanted to say that) here is how I made the stars. Well actually only one, but you get the point.


Supplies that you will need for this project:
A large cereal box (per star, unless you make small stars)
Hot glue
Spray paint (white or black will work)
Mod podge (or make your own with Elmer's glue and water)
Ten scrap book papers with fun colors or patterns on them.
Black acrylic paint


Step 1. Print a picture of a five point star. I used Microsoft Word's shapes and chose the star shape and then stretched it so it took up as much of the sheet of paper as it could. 
Step 2. Cut out the paper star and use it as a stencil to trace onto the cardboard. Trace two stars and cut them out. NOTE: on the second star I cut out little tabs to help when I glue the stars together later. 


Step 3. Using a ruler and a pencil draw lines (with pressure added) from the tips of the star through the middle to the point on the bottom. The point of this is not to draw lines, but to make indentations that will help you fold the star later. When I did this I used a mechanical pencil that didn't have any lead out so it would dent the cardboard without leaving pencil lines. I did it on the white paper below so that you can see how it would look. The blue lines are the lines you are creating.
Step 4. Fold the star on the lines you etched. See the picture below to see where to fold up and fold down.
Step 5. Glue it together. Good luck, this was the hard part for me. Also it doesn't really matter if you get extra glue on the sides but make sure it gets smoothed out. If the stars don't fit together perfectly, line them up as best as you can and then use a scissors to cut off the extra.

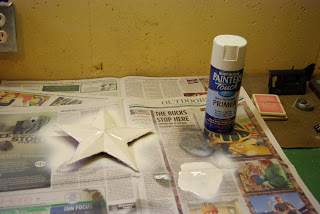
Step 6. Spray paint both sides of the star. I chose to use white, but I think black could look really cool too. I also would love to try it with chalk paint so you could write messages on the back. Let it dry for an hour or so based on your paint. I let it dry overnight because I ran out of time and it was getting late. 


Step 7. Cut out a template from the white star that you used to trace the cardboard. Use this to trace 5 triangles onto scrapbook paper of your choosing. Then flip the stencil over and do the same thing. This will give you all the patterns you need to cover the star. 


Step 8. Once you have all the pieces cut out you need to glue them on. I painted my mod podge onto the surface of the star, put my patterned piece on top of the glue, and then put a coat of mod podge on top. Be very careful not to use too much glue when you do this, because you don't want soggy paper.


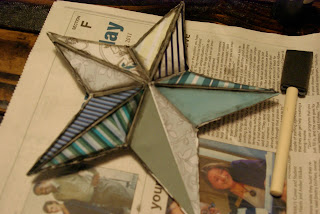
This is what it looks like with all the pieces glued on. If you want you can stop here. 


I decided not to be finished yet. If you decided to add more to your star, you can make it look weathered by following the final steps.

Step 8. Use a little bit of black paint and a sponge brush or normal paint brush to add the black paint to the edges. Blend it into the paper. Again be careful to not get the paper too wet. It will peel and fall off.


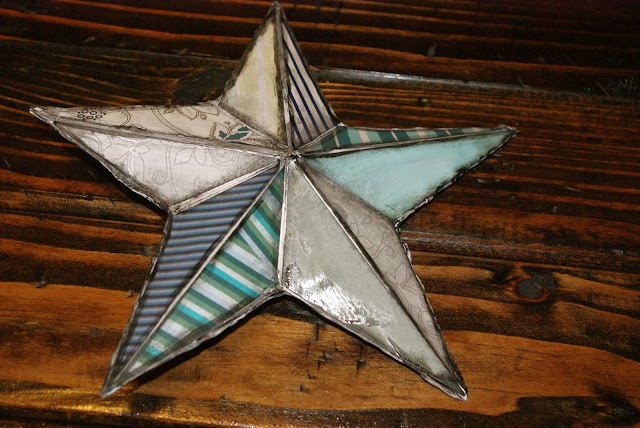
This is what my finished star looks like. I think it turned out pretty well. I love how it looks hanging on the curtain hooks. If you decide that you want your star to hang, grab a christmas ornament hook and punch it through the back of the star.


Let me know if you try this. Also, note the table surface that I created this on. It is the table I made earlier. :)

Sunday, November 20, 2011

A Place for my Coffee (part 2)


I was finally able to finish (note my attempt at word humor.) my table. I spent this weekend putting stain finish and two coats of glossy coat on every inch of my table. Because it is November I did it inside my garage. Just a note to anyone trying this, OPEN WINDOWS this stuff is STRONG.

Minwax<sup>®</sup> Wood Finish™This is the stain I used. It worked great. I would recommend it to anyone. It is Minwax Wood Finish in "Jacobean". When I first tried it on a piece of test wood I let it sit for a few minutes. It turned out almost black, which was darker than I wanted, so when I actually stained the table I put the stain on and then wiped it off right away.


This is what the table looked like after being stained. This is also the point I started to freak out because it wasn't the color I had pictured in my head. Because "Jacobean" is more of a grey-brown color than a red-brown color the table looked like old wood and not in the fake-really-nice-looking old wood kind of way.

Not being one to give up (plus the added motivation of having spent hours on this table already), I returned to Home Depot hoping some knowledgeable worker could save my project. Lucky for me Mike (my friendly Home Depot employee) had a solution for me....Minwax Polyurethane "Glossy". 

Minwax<sup>®</sup> High-Build Polyurethane

It was a miracle cure for my drab grey table. After applying one brush stroke I realize that it made my table look so much better. I applied a total of two coats and I am so pleased with how this table turned out!

So in total, this cost me about 35 dollars. Which compared to Pottery Barn's Hyde Coffee Table ($400.00) is a pretty great deal if you ask me. Now I need a house or apartment to put it in. I would also love to create a side table that matches. Maybe I will do that in the future, but for now I have an amazing homemade place to enjoy my coffee. As always let me know what you think. Do you love it as much as I do? Also, to see how I built it click here!


Monday, November 14, 2011

Just like Anthropologie

Yesterday I was able to go casually shopping with a friend. We wanted to check out the BRAND NEW!!! Anthropologie that just opened in Michigan, and she had never been to Hot Mama so we added that to our list. Usually when I go to those places I suddenly remember that my wardrobe doesn't even come close to the stylish outfits that are housed in these beautiful stores and I have a strong desire to purchase absolutely everything that I see.

This time however was a little bit different. I decided to give my new necklace a trial run to see how it was accepted. I wasn't 100 percent sure that I could handle the amount of flowers I had added or how large I had created it, however once it made its debut I realized that I had nothing to worry about. In BOTH stores we went to I had workers approach me and complement the necklace and ask where I had gotten it. While we were in Hot Mama the adorable woman working there even asked if I sold them and came over to touch it and look at the back. I no longer felt like my wardrobe was lacking, and it was amazing to realize that for once I was stylish enough to stand out in these super stylish stores. That was enough for me to decided that I love the new necklace. I hope that you all feel the same way.

Also, if you decided to make one please let me know how it turns out. I would love to see other unique designs.


Step 1: Gather materials.
For this project you will need...

Felt
Fabric  
Simple necklace or chain to attach the flowers to
Scissors 
Hot glue gun
Hot glue sticks


I decided that I wanted to make cream colored flowers that I could use to dress up a deep purple shirt that I just picked up from target. (You really can't go wrong with an 8 dollar shirt) so I used a ribbon that Pottery Barn was handing out last Christmas. It was a stiff fabric. I chose to use it because I loved the rich cream color. I'm sure any fabric would work for this project though. 

I also decided to use a beaded necklace to add some character to the whole project. I changed to a brown necklace later because I decided that I didn't like the one pictured below.
Step 2. Cut out ten circles from the felt. Five of them will be the base for your flower. Save the other five for the end. Mine are about 1 1/2".

Step 3. Cut out a bunch of circles from the ribbon or fabric of your choice that are the same size as the felt circles you cut in step two. I used the felt circles for stencils and cut around them. These are going to be your petals. For those of you concerned about cutting perfect circles...stop worrying. It isn't one of my talents either, and it really doesn't matter for this project. I ended up cutting out about 60 circles so that each felt circle would get twelve fabric circles. An easy way to do this is to fold the fabric so that you can cut out a bunch of circles at once.
Step 4. Pinch one of the cloth circles in your fingers. Add a dot of hot glue to the tip and glue it onto the middle of the felt circle. 
Step 5. Do this with the remaining twelve circles that you cut out for this felt circle. Arrange them around the middle one to create petal-like shapes. Remember to arrange them so they cover the whole felt circle. Repeat this process with the four remaining flowers.
Step 6.  Arrange the flowers on the necklace just the way you want. I suggest putting them right next to each other with a little gap between the edges of the felt. This with allow the necklace to swing separately and will make it look less stiff.  Glue them onto the necklace with hot glue.
Step 7. Cover the necklace and glue with one of the five felt pieces that you set aside at the beginning. Make sure that all the edges of the felt are glued down. 
Step 8. If the fabric you chose is prone to fraying, an easy fix is to buy a bottle of clear nail polish and paint it on the edges. It will be invisible, and it will stop the flowers from falling apart. 
And that is all there is to it. Pretty simple and pretty beautiful. This is how mine turned out. 

Ps. Sorry for the quality of these photos, my digital camera is broken so I had to take these with my Ipod. Also thanks to Little Miss Mama for the inspiration.