Saturday, December 17, 2011

Canvas Christmas

This craft was suggested to me by a friend who wanted to make them as christmas presents. I loved making them and after a little practice and a few failures I think that it turned out to be a pretty successful project. I also didn't mind having company while making them. I have been waiting to post this for a few weeks now, but I promised I would wait until after Christmas so that I wouldn't ruin any surprises. 
The photography classes that I have taken have taught me how expensive a picture printed on canvas can be. This project astounded me with how amazingly cheap making your own canvas picture can be. An additional bonus is that it is very easy. I do have to admit that the quality of the image was slightly less perfect than if it was professionally done, but I think the damaged parts add character. I also chose pictures that I took in chicago and it was cool for me to see how they turned out.

So, here are my instructions on how to create your own canvas images. 

Supplies:
  • A picture printed from a laser printer - Since a normal piece of paper is 8.5x 11 I wouldn't try to make anything bigger than that unless you have access to a large printer. I also only used black and white pictures, but colored should work as well.
  • A canvas- I used one that was 8x10.
  • A gel medium-I used Golden Gel Medium in both gloss and matte, but I prefer the matte finish better.
  • A paint brush
  • A spray bottle filled with water


Step 1. Apply a layer of the gel medium to the canvas. Flip the picture over so that the image side is down and line the picture up with the edges of the canvas.

Step 2. As the image begins to stick to the gel medium it will wrinkle a little bit. The best way to get the wrinkles out is to smooth them to the edges with your fingers or a credit card. I have never had an image where all of the wrinkles were completely removed, but if you work at it for a little while you can get most of them out. 
 Step 3. Wait for the canvas to dry. It should be dry in several hours, but if you can wait for it to dry overnight that is my suggestion.
Step 4. Once it is dry spray the paper with water and start rubbing the top layer of paper off. Be careful that you don't rub too hard. If you do it will remove the actual image from the canvas. I have never removed the paper without leaving at least one small hole. Don't be too concerned if this happens. It makes the picture look worn.
Step 5. Let it dry. You will notice that as it dries the paper begins to cover the image again. You will need to repeat steps four and five a few times to get all the layers of paper off. It doesn't need to be 100 percent perfect but it does need to be mostly removed.
Step 6. Let it dry, and then put a layer of gel medium on top of the picture to seal it. Make sure you get the edges as well. Let it dry and then you have a finished image. 
Have fun. Let me know if you make any, I would love to know if anyone's turn out really well. 


The Key to Your Art

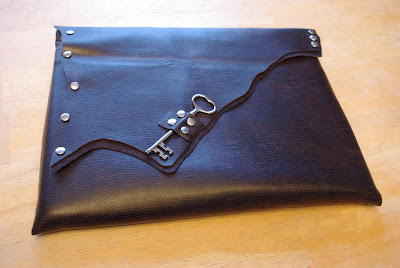
Computer Case

I am not the most graceful person. I trip on a constant basis, and it is a good day if I don't drop something. Now this isn't that big of a deal most of the time. As an extremely clumsy person I have perfected the art of looking graceful while picking up papers and books that I dropped; I can even do it at a pretty speedy rate. However, this did become a problem when I decided to start carrying my laptop around. Unlike books, when a laptop falls it is a problem. After two dented corners from falls (you think I would have learned after one) I decided that I needed a safer way to carry my laptop...I needed a case. The cheap part of me had no desire to shell out actually money for a case so I decided to make one. So here it is. I hope you like it.
Supplies:
Leather fabric (mine was a fake leather which is cheaper and works just as well)
Fabric for the interior (whatever texture and color you prefer)
A sewing machine, or a needle, thread, and a lot of mental strength and physical endurance.
Rivets
A key (look in the jewelry section of most craft stores)
Fabric glue

Step 1. Measure your computer, then add three inches to the measurement. For example if you have a computer that is 9x13 you will bump your measurement up to 12x16. This allows you to have an extra inch and a half on each side to work with when you sew. Just a note, since my computer is really thin, I didn't have to worry about the thickness affecting the fit. If your computer is thick add a couple extra inches to the fabric.

Step 2. Measure the fabric that you plan on using for the interior. The length will be the length you calculate in step 1. If we stick with the example measurements above that means that it will be 16 inches. We are going to double the measurement of the height so that we can fold it in half to create a pocket. That means that the height will be 12x2= 24 inches. Fold the fabric in half so the crease is at the bottom. This will give you two layers of fabric that are connected and both measure 12x16.
for blog
Step 3. Sew both sides of the fabric together about an inch in so that you have a pocket that will fit your computer. The bottom will be where the fold is so once the sides are sewn, only the top will be open.
Step 4. Cut a piece of leather that is the same width as the interior fabric that you just cut, but is the 3 times the length you measured in step 1.  
for blog
Step 5. Fold the bottom part of the leather fabric up the the middle section. Lay the interior fabric on top of the folded part. Make sure that the opening is on the top. Sew the sides just like you did with the interior fabric to create another pocket, but this time sew through the leather fabric and the interior fabric. Make sure that you are sewing outside of lines you sewed in the interior fabric. Leave the last inch and a half at the top of each side not sewn. IMPORTANT: If your leather is different on each side make sure that part you want to see is inside of the fold. This means that you are laying the interior fabric on the bad side of the leather. We will be turning the bag inside out later.
for blog
Step 6. Fold the bag inside out to make sure that it looks good. This is a good time to see if it is the right size by putting the computer inside it.  Fold the bag inside out AGAIN, But this time make sure that the interior fabric is on the outside of both sides, and the leather is all on the inside. (except for the lid flap.)

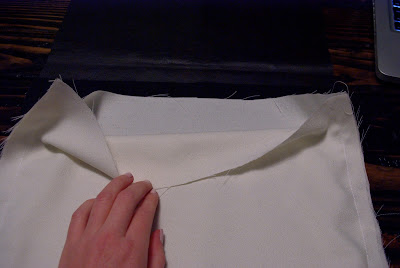
Step 7. Fold over the inch and a half that you left loose in step 5 and sew it through the white fabric. This makes the interior look better. Make sure that you ONLY sew the flap and the white fabric otherwise you run the risk of sewing your bag shut.
This is what it will look like. 
(I cut the design for the front flap at this point so the jagged fabric that you see is going to be the front flap)
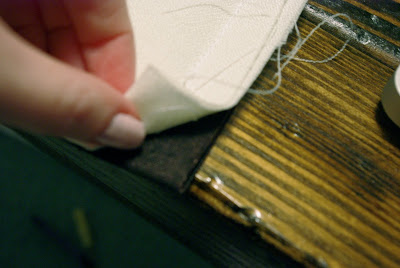
 Step 8. Flip your bag over and cut a piece of fabric that is a little bit longer than the front flap, and the same width. Lay it overlapping the interior fabric by an inch and a half with the side you want showing facing up. (Make sure that it lines up with the folded part that you just sewed in step 7. When you turn the bag inside-out again you want the leather fabric in the interior to be the same length all the way around.) Sew it on the same way you did in step 7 making sure you only attach it to the white fabric. Then sew up the sides until you reach the top of the white fabric.
Flip it over again and this is what it looks like.
Turn the bag inside-out again for the last time. It should have the leather on the outside, and the interior fabric on the inside. 

Attach rivets to the sides of the flap. This creates a neat design, and holds both pieces of fabric together. I decided to only put them down the sides of the flaps, so the front still needs to be connected. For this i just used fabric glue. NOTE:If you are adding a key to the front wait to use the fabric glue until after the key is attached.


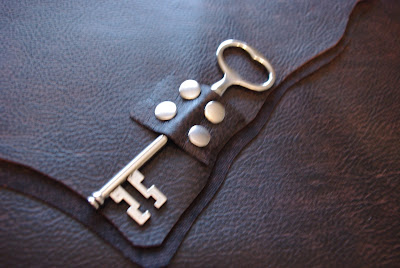
Step 10. To attach the key, cut a small piece of fabric that will be able to hold the key on with two sets of rivets on each side. (see pictures below) Punch two rivets through the top layer of flap only. Lay the key the direction that you want it to face, and attach the two other rivets to hold it on. If you feel like it might slide out, you can always add a few stitches around the key.
 Add some fabric glue between the two layers of the front flap, and that it is. You are finished. This is what it will look like.
And this is how well my computer fits.